This is a study course for adult beginners who want to learn piano by themselves.
Step 2 is to memorize the note names and finger numbers.
Once you've memorized this far, it's time to actually perform.
There are many things you remember in your head, but they are all very important elements.
Many people may have learned the ``note names'' and ``keyboard positions'' during music class when they were little, using a keyboard harmonica or organ.
If you have memories of that time, you can skip it.
If you have forgotten what it is, please study it again.
Let me explain in detail.
The required time is ``about 15 minutes.''
table of contents
This time's theme
- "note name"
- "Keyboard position"
- "Finger number"
- "Let's try playing it"
note name
First, let's talk about pitch names.
"Do Re Mi Fa So La Si"
The name becomes the note name.
As the note starts with "C" and becomes higher pitched, it continues with "Les Mi Fa...".
After "shi", it becomes "do" again, and this process is repeated.
If you think about it for a while when asked, "What's next after Fa?", it will take a lot of time to learn.
Please keep this order in mind.
For example, it's like an arithmetic multiplication table.
Make sure to memorize the order so that you can practice the piano efficiently.
In reality, if we were to explain strictly the words ``note name,'' ``scale,'' and ``scale name,'' the explanation would be difficult and long.
You don't need to memorize these at first, so just memorize the note names.
keyboard position
You need to know which keys on the piano the "note names" mentioned above apply to.
Next, we will learn about the position of the keyboard.
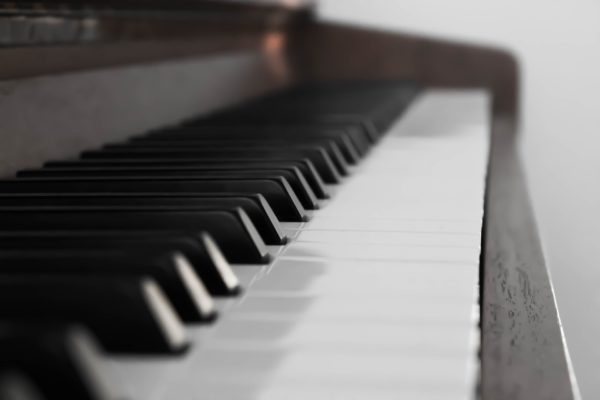
First, let's take a look at the keyboard.
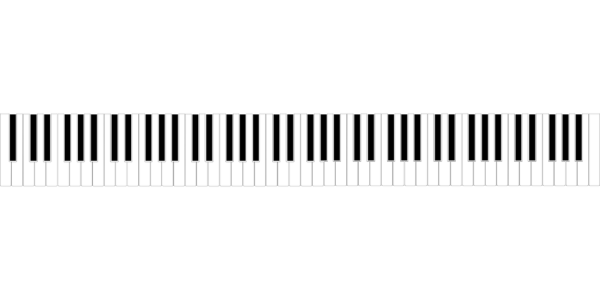
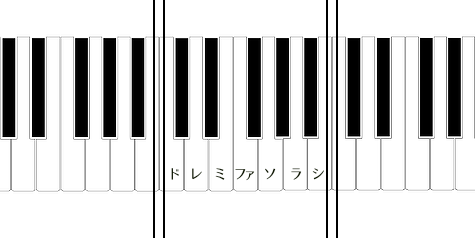
If you look at the black keys, which are the black keys, you will see that they are arranged regularly, ``two in a row, three in a row, two in a row.''
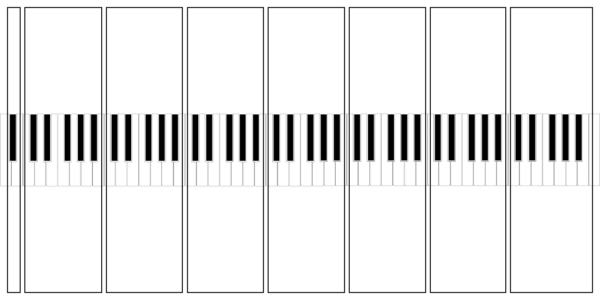
When thinking of note names on the piano, use this arrangement to divide them into sections as shown in the following diagram.
In other words, 5 black keys and 7 white keys become one section.
By dividing the keyboard in this way, it becomes easier to understand the note names that correspond to each keyboard.
By the way, this one section is called octave
If you expand this one octave and add note names, it will look like the image below.
The leftmost one becomes "do" and from there it becomes "re mi fa...".
Although it is not written, both the right octave and the left octave have the same pitch name "Do Re Mi Fa So Rashi".
Now you know all the note names.
By remembering the position of this keyboard, you will be able to play smoothly when practicing by looking at the sheet music.
finger number
Next is the finger number.
As the name suggests, finger numbers are numbers assigned to each finger.
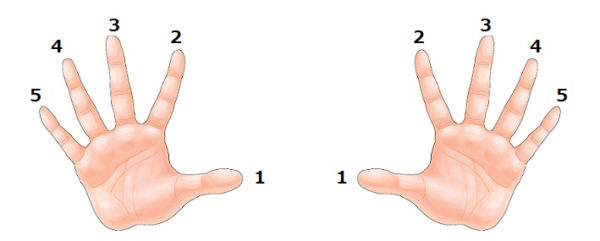
As shown in the figure
・Thumb: 1
・Forefinger: 2
・Middle finger: 3
・Ring finger: 4
・Pinky finger: 5
It becomes.
At this time, there is no distinction between right and left hands, and both use the same number.
Therefore, you have to decide which hand number to use based on the situation at the time.
Finger numbers are sometimes written below the notes, especially in sheet music for beginners.
In that case, it is used to mean "play that note with the finger numbered
You'll learn more about how to read music in Step 4, but for now, just memorize the numbers and their corresponding fingers.
By the way, finger numbers are used not only on the piano, but on a variety of other musical instruments.
If you have played an instrument other than the piano and know the finger numbers, you should have no problem thinking about it in the same way.
Let's actually practice
So far, we have learned ``note names'', ``keyboard positions'', and ``finger numbers''.
Let's use them to play the following exercises.
It is created using simple sound sequences without using difficult techniques.
You will practice with your right and left hands separately, but at first the sounds played with the pinky fingers of either hand tend to be small.
If the loudness of the sound is extremely different depending on your fingers, your posture or the way you are applying force may be incorrect.
Please go back to step 1 and try learning again.
Also, be sure to play each note smoothly, not just the volume.
If you can't do it, practice it over and over again.
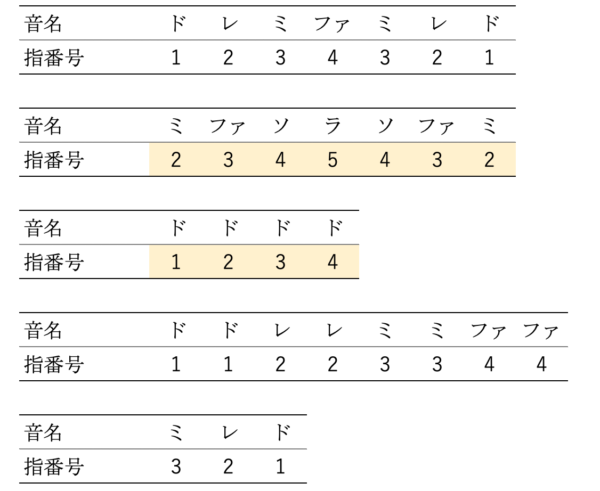
Right hand practice ①
First, practice your right hand.
Place your right thumb
Then, play the piano keys corresponding to the following note names using each finger number.
During practice, play in order from left to right.
Right hand practice ②
Next, play up to the "A" note.
As in ①, place your right thumb at the "C" position on the keyboard.
The first phrase of "Twinkle, Twinkle, Little Star" is played.
Try to play rhythmically while sliding your hands , trying not to stop between "G" and "A" as much as possible
Right hand practice ③
This is the final right hand exercise.
The song that will be played is the nursery rhyme ``Frog Chorus.''
This will be a longer performance than before, so let's progress little by little, stopping in the middle.
Also, this time we will play ``successive keys with the same note names'' using ``slightly different fingers.''
Please pay attention to the finger numbers.
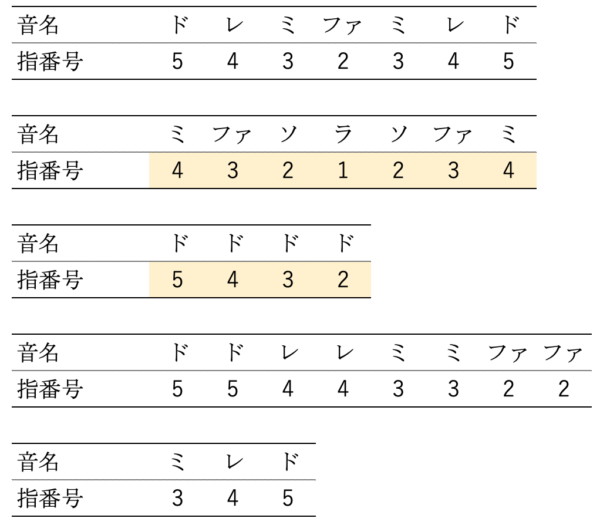
Left hand practice ①
Next, we will practice the left hand.
The content to be played is the same as the right-hand practice, but the finger numbers are reversed.
Since many people are right-handed, many people have trouble playing with their left hand at first.
It's something everyone struggles with, so don't rush and practice more slowly than with your right hand.
Place the little finger of your left hand (Thumb is "so")
Then, play the piano keys corresponding to the following note names using each finger number.
During practice, play in order from left to right.
Left hand practice ②
The content is the same as the right hand exercise.
Compared to the right hand, the thumb of the left hand is on the right side, so it may be easier to play with the left hand in this exercise 2.
Left hand practice ③
Finally, there is "Frog Chorus".
Pay special attention to the volume and rhythm when playing the notes played with finger number 5 and little finger.
This lesson is over if you can play smoothly until the end.
It will take more practice to be able to play with the right and left hands in the same way.
For the hands that took a long time to be able to play, we will continue to focus on practicing them in subsequent lessons.
Summary of this lesson
- "note name"
- ・The names of C, R, E, F, G, A, C are pitch names.
- ・After Shi, it becomes C again.
- "Keyboard position"
- -Keyboards are divided into different sections
- ・One section is called an "octave"
- ・The white keys in one octave become "Do, Re, Mi, F, G, La, C" in order.
- "Finger number"
- ・Thumb: 1, index finger: 2, middle finger: 3, ring finger: 4, little finger: 5
- -Fingers on both the right and left hands are numbered the same way
- ・If there is a number written on the sheet music, play with the finger corresponding to that number.
Basic piano course
- Step 1: How to play correctly
- Step 2: Note names and keyboard positions
- Step 3: Notes and rests
- Step 4: Sheet music and clefs
- Step 5: Measures and slurs
Kinjirochoden says
I'm 70 years old and have to learn by hand, but I'll do my best.