Many people who start playing the piano find that the first thing they have trouble with is their left hand.
In particular, when playing single notes in succession at short intervals rather than chords, it is necessary to create a sense of unity in the volume, rhythm, and connection of notes called legato.
I will explain how to play the piano well with your left hand and what you should do to improve your practice, step by step, based on my experience.
table of contents
step 0 chord
Being able to play chords accurately is the minimum requirement for moving on to the next steps.
You might be thinking, “That’s easy!”
Surprisingly, many people are unable to do so.
are you able to play all three keys at exactly the same time
Listen carefully to make sure that the keys are not pressed slightly out of alignment, such as (C → E → G) or (G → E → C).
If your fingers are slightly misaligned, the force is not evenly applied from your fingers to the keyboard.
This is not a problem with practice, but rather with posture and the shape of your fingers, where you extend your arm and the type of fingers you use, which can cause an imbalance.
The way your muscles attach and your center of gravity are not symmetrical, so you need to master how to apply weight and apply force that suits you.
Check out this article to recheck your posture and finger shape.
Step 1 Rhythm
Once you can play the chords at the perfect time, the next step is rhythm.
Once you get the rhythm right, you've taken the first step in mastering the use of all the finger muscles on your left hand.
Piano skills deteriorate when there are blank spaces, but I think that the skill to play with a sense of unity in this rhythm is particularly impaired.
We recommend that you incorporate rhythm practice into your daily practice even after your piano skills have improved somewhat.
First, practice using a metronome until you can play very simple songs in rhythm.
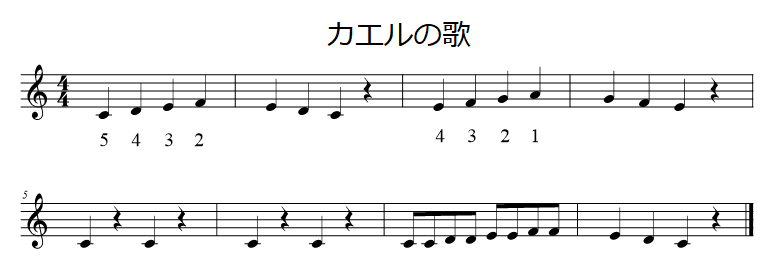
This time I will explain using "Frog Song" as an example.
The melody of the frog song is the sheet music shown above.
Some of the numbers written below the notes are examples of finger numbers. Try playing using all your fingers as much as possible.
Among these, many people struggle with their little finger, which has weak muscles.
Therefore, try to use the "5", or pinky finger, more often .
Practice this with your left hand. Let's first play at the tempo
This tempo is much slower than the actual speed of the song.
Actually, there is a reason for this.
Practicing at a slow tempo first not only makes it easier to play, but allows you to clearly see which fingers are struggling .
Once you are able to do this, try increasing the tempo. It's also inefficient to change the tempo too closely, so personally I think the three steps are sufficient.
Step 2 Size
Once you are able to play along with the rhythm, practice focusing on the loudness of the notes.
In the beginning, due to differences in muscles, the thumb tends to produce louder sounds and the little finger tends to produce softer sounds.
Practice until you can adjust the volume of the notes by yourself according to the instructions on the sheet music , regardless of which fingers you use
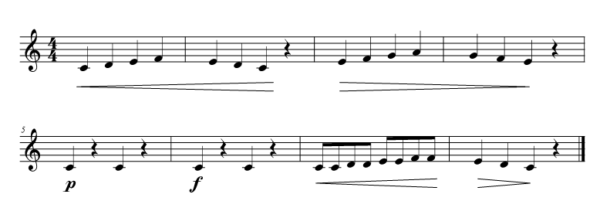
As an example, I added an arrangement of "Frog Song" just like last time.
In the case of the musical score above, especially in the second and third measures, the volume of the sound changes in opposition to the size of the finger muscles.
For this part, make sure to listen carefully to the notes you drew and check whether you are able to reproduce the score.
This time, I arranged it appropriately for practice, but you can add the strength or weakness to whatever you can think of based on the image and scene of the frog song.
However, since this is just practice, you may want to arrange the score so that you can make loud or soft sounds with your little finger.
Practice until you know how loud the sound is produced by pressing the keys with which fingers and with what force.
Step 3 Legato
Legato is playing notes that are connected smoothly
It is the complete opposite of staccato, and is the same as a "slur" in music notation.
Up until Step 3, the keystrokes on the piano were important. However, this time, the opposite `` key release'' (removing your fingers from the keyboard) is extremely important.
What often happens is that we try to be conscious of leg guard by adjusting the timing of playing the next note.
There's nothing wrong with this, but what you need to be especially careful about when practicing with your left hand is when to stop the sound.
When you take your fingers off the keyboard, the hammers that produce the piano sound return to their original positions, in the opposite direction to when you hit a key.
The speed at which this hammer returns makes a difference in how the sound develops.
Therefore, when playing legato, release the key as gently and slowly as possible .
Although electronic pianos do not have hammers, the way they produce sound when the keys are released is similar to that of upright pianos, and the technology is improving year by year.
Similarly, when playing an electronic piano, be conscious of when you release the keys.
In fact, mastering legato is a very difficult technique not only for the left hand, but also for the right hand.
Not only in ``The Frog Song,'' but in everyday situations, be conscious of legato, that is, key release, and make the connections between the sounds smooth.
Recommended sheet music for left hand practice
Hanon's Part 1 is perfect for first practice, regardless of whether you are playing with your left or right hand.
This was originally created for finger training, and is useful for all exercises from Steps 1 to 4.
This is a song that everyone should practice at least once.
②Czerny Etude No. 30 (Op.849) No.24
It's a few steps higher than Hanon's, but it's a fun practice piece to play and listen to.
I think it's a good practice because it combines various practice elements.
Also, if you can play to this point, you will have acquired the technique to be able to play many of your favorite songs well.
Leave a Comment